Wednesday, October 13, 2010
Wednesday, September 29, 2010
Friday, September 24, 2010
Nutella Tarts
Nutella Heaven
If you have never tried Nutella... you must!
Nutella is made from hazelnuts and has the consistency of a spreadable peanut butter.
A lot of people spread it on bread and eat it for breakfast.
I like to eat it as a treat, with it's smooth taste, it's as decadent as dessert.
Nutella in cased in a tart-like shell with a heart on top is simply... Heaven!
I took detailed shots on how I made this tasty treat, but lost all of the photographs that were on my cameras memory card. So, unfortunately I can only share the recipe and instructions.
Tart Dough:
2 Cups All Purpose Flour
1 Tablespoon Sugar
1 Teaspoon Salt
1 Cup Butter, cold, cut into 1" squares
1 Egg
2 Tablespoons Milk
1 Teaspoon Vanilla Extract
1 Jar Nutella Spread
In a large bowl add the flour, sugar and salt and mix together with a whisk.
Cut the butter into pats and add the butter to the flour mixture. Using a food processor, pastry blendor or just your good ole' hands to mix the butter and flour together creating small bits of butter and flour.
In a small bowl, add the egg, milk and vanilla and mix well.
Add the egg mixture to the flour bowl and blend together to make a fairly moist dough.
Add flour to your rolling surface and roll the dough out to about of an 1/4" to cut out your circles about 3" x 3" and place each circle in your small cupcake pan.
Add 1 teaspoon of nutella to each tart.*
This dough should make about about 20 tarts.
I saved some of the dough to cut out tiny hearts to top each tart.
*I would use a pastry bag to do this method. like I DIDN'T! :)
Labels:
Recipes
Wednesday, September 22, 2010
Thursday, September 16, 2010
Jamba Juice in the HOUSE
Jamba Juice Freak?
I love Jamba Juice, and if you do too you can get a FREE Jamba Juice smothie by purchasing one at the regular price. Don't wait to long, because this coupon expires on September 22nd!
Get your FREE Jamba Juice coupon!
Labels:
The Free Spot
Wednesday, September 15, 2010
Tuesday, September 14, 2010
In the Works
A layer cake from Moda: Lumiere De Noel
I haven't done a quilt in quite a few years and never bigger than baby size, so I am excited and nervous to take on this task, which I hope to give as a Christmas gift.
I was really drawn to this collection, mostly by the French inspired theme and the color red.
I was really drawn to this collection, mostly by the French inspired theme and the color red.
Keep tuned as I cut with no pattern in mind and I just go by feel and the design of each square to guide me.
Why don't a have a quilt plan? Because, what fun would it be to be prepared and that's how I roll, with things like this.
Labels:
Articles
Saturday, September 11, 2010
An Apple for Teacher
Give Teacher An Apple Bouquet
With the kids returning to school this week giving a thoughtful, creative and inexpensive gift to your child's teacher is a nice way to start off the new school year.
You'll need five apples, a bunch of pencils, a vase and a length of coordinating ribbon to go around the vase to be tied into a sweet bow.
Labels:
Craft It
Wednesday, September 8, 2010
Wednesday, September 1, 2010
Friday, August 27, 2010
Lemon What Lemon Who
A lot of recipes call for zesting, grating or peeling of a lemon.
Do you know what they mean when they use these terms and do you have the tools to do it when it calls for it?
Here is a little kitchen lesson for the next time your recipe calls for the zesting, grating or peeling of a lemon, you'll know what they mean and what you'll need to do it.
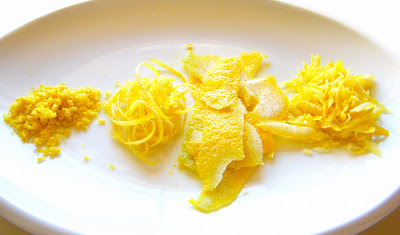
Lemon Zesting
Lemon zest through a lemon zester, that creates lemon curls, is easy to use and can be used if the recipe calls for the curling of the lemon. The zester is also a good tool for creating garnish with a dish. The zester glides right across the lemon without straining the muscles in your hand or arm to do it. This zester makes those fabulous candied peels you like to snack on.
Making orange chicken for dinner? Run this zester across an orange and add it to the dish and see what a difference it makes to the finished product in taste and in looks!
Lemon Grated
The recipe may call for grating or even zesting, which would require a finer degree of the lemon. I have a small grater which creates this. You can also use a Microplane to get this same result, so in end the preference comes done to you.
I like using my grater over a Microplane, because the grated or zested peel can really be tasted in the final recipe and not hinted by the finer result of a Microplane. Again, it boils down to preference.
Lemon Peel
Peeling a lemon is as simple as it gets. You peel the lemon with a peeler, just like you would a potato. Although a lot of recipes won't call for the peel in the actual baking recipe, but there are recipes out there, like my Strawberry Lemonade where it is imperative to follow the recipe and use it. The peel is usually so potent, because of the overall amount of the flavor in a full peel, your going to really taste it in the recipe.
So, that is my little take on the zesting, grating and peeling of a lemon and what it takes to get these result. If you find a recipe that calls for any of the above, do it you won't be sorry you did!
As Paula Dean would say, "From my kitchen to yours."
**All photographs have an embedded watermark**
Labels:
Recipes
Thursday, August 26, 2010
Wednesday, August 25, 2010
Friday, August 20, 2010
Strawberry Lemonade
This ain't your average lemonade stand!
3 Cups Water
2 Cups sugar
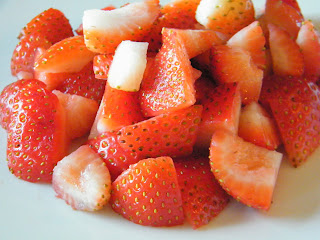
2 Cup Strawberries, hulled & sliced into quarters
3 - 5 Lemons to create:
3/4 Cup of Fresh Lemon Juice
Rind of one lemon, peeled
In a medium saucepan, over medium heat, add 3 cups of water.
Peel the rind from one lemon and juice your lemons
to make 3/4 cup of fresh lemon juice; set aside.
Add the lemon rind and sugar to your pot of water and bring it to a boil.
Boil for two more minutes.
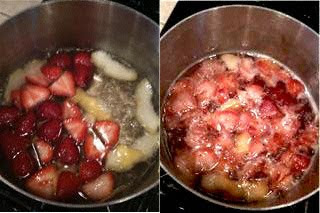
Add one cup of strawberries to the sugar mixture.
The strawberries will begin to turn soft.
Take a wooden spoon and smash the strawberries
against the side of the pot to incorporate them into the sugar mixture.
Turn the heat down and simmer for two more minutes.
Remove the saucepan from the heat and let the mixture cool.
Using a fine strainer; strain your sugar mixture into a pitcher.
Add your 3/4 cup of lemon juice to the lemonade.
Add the remaining cup of strawberries and
pour you lemonade into a pitcher
and place in the refrigerator to chill.
My husband is a fan of strawberry lemonade,
which makes him a harsh critique,
and I am happy to say this recipe passed his test and I quote,
"Mmmm, this is REALLY good!"
Top it off with a sliced strawberry
and you will impress the masses of thirsty loved ones.
3 Cups Water
2 Cups sugar
2 Cup Strawberries, hulled & sliced into quarters
3 - 5 Lemons to create:
3/4 Cup of Fresh Lemon Juice
Rind of one lemon, peeled
In a medium saucepan, over medium heat, add 3 cups of water.
Peel the rind from one lemon and juice your lemons to make 3/4 cup of fresh lemon juice; set aside.
Add the lemon rind and sugar and bring to a boil. Boil for two minutes.
Add one cup of strawberries to the sugar mixture. The strawberries will begin to turn soft. Take a wooden spoon and smash the strawberries against the side of the pot to incorporate them into the sugar mixture. Turn the heat down and simmer for two more minutes. Remove the saucepan from the heat and let the mixture cool.
Using a fine strainer; strain your sugar mixture into a pitcher.
Add your 3/4 cup of lemon juice and the remaining cup of strawberries and place in the refrigerator to chill.
** All photographs have an embedded watermarked
Labels:
Recipes
Wednesday, August 18, 2010
Friday, August 13, 2010
Lemon Pound Cake
Super moist, super good!
You don't need a lot of ingredients to make this cake
and by no means is it hard to make and you can certainly see it's worth it.
Lets begin:
Here's what you'll need...
1 1/2 Cups All Purpose Flour
1 Teaspoon Baking Powder
1/2 Teaspoon Salt
1 Cup butter, softened
1 Cup Sugar
4 Eggs
2 Teaspoon Vanilla Extract
1/4 Cup Fresh Lemon Juice
Okay, I forgot to put the lemon on the tray... no big deal.
Picture it in your mind.
Preheat the oven to 350 degrees.
Line your bread loaf pan with parchment paper.
Yeah, yeah, no pictures of this either.
In a medium bowl cream your butter.
That's right... I am giving you pictures of the stuff, but not the work.
Then add the sugar and mix again.
Add each egg one at a time with the mixer running on slow.
Add the vanilla.
In medium bowl add the flour...
baking powder...
and salt.
Zest the lemon and juice it to make enough for 1/4 cup of juice.
In equal parts, alternate between putting a portion of the flour mixture and the lemon juice into the butter mixture ending with the lemon juice.
Put the lemon mixture in the loaf pan and bake for 60 minutes or until a tooth pick test comes out clean.
1 1/2 Cups All Purpose Flour
1 Teaspoon Baking Powder
1/2 Teaspoon Salt
1 Cup butter, softened
1 Cup Sugar
4 Eggs
2 Teaspoon Vanilla Extract
1/4 Cup Fresh Lemon Juice
1/2 Teaspoon Lemon Zest
Preheat the oven to 350 degrees.
Line your bread loaf pan with parchment paper.
In a medium bowl cream the butter.
Then add the sugar and mix again.
Add each egg one at a time with the mixer running on slow.
Add the vanilla.
In medium bowl add the flour, baking powder and salt.
Zest the lemon and juice it to make enough for 1/4 cup of juice.
In equal parts, alternate between putting a portion of the flour mixture and the lemon juice into the butter mixture ending with the lemon juice.
Bake for 60 minutes or until a toothpick comes out clean.
** All photographs have an embedded watermarked
Labels:
Recipes
Wednesday, August 11, 2010
Friday, August 6, 2010
Lemon Basil Chicken
There's not much to making this chicken,
but it serves up a wonderfully tasty meal!
(The following ingredients are for one fryer)
One 3 Pound chicken fryer
Pull all the "fun stuff" out of your fryer and either set aside for an other use or throw it away. Rinse your chickens with cool water and pat dry.
1 Whole Lemon, zested
2 - 4 Tablespoons of butter, room temperature
3 - 4 Cloves Garlic, chopped
2 Tablespoons Basil Leaves
In a bowl, add the butter, and the lemon zest from your lemon and mix well.
I squeezed a bit of the lemon juice in also.
Add in the basil leaves and your mixture should look like this.
Rub your butter mixture all over your fryer.
The real secret to moist chicken is...
put the butter mixture under the skin!
Tie up the legs and tuck in the wings.
(I like to place the chickens on onions ,
so they don't stick to the pan and give the chickens a little flavor.)
Bake at 375 degrees for 1 1/2 hours or
when the internal temperature reaches 180 degrees.
Serve the chicken up with a nice salad and your ready to go.
The buttering process is a little messy,
but it is an easy meal to cook and that is why I cook two at a time!
The Recipe:
One 3 Pound Chicken Fryer
1 Whole Lemon, zested
2 - 4 Tablespoons of butter, room temperature
3 - 4 Cloves Garlic, chopped
2 Tablespoons Basil Leaves
Labels:
Recipes
Subscribe to:
Comments (Atom)


